One dramatic difference you’ll while shooting a football game is how the light changes if you’re shooting a game that overlaps the sunset. This first game I shot ran the full gamut from daylight to sunset/shade to stadium lights. Experienced sports shooter should already known to shoot in aperture priority, but for those who are relatively new to this sort of thing, see this post for some points about exposure technique for outdoor sports using aperture priority.
Daylight
Anyhow, full daylight creates problems with extremely harsh shadows, particularly on player’s faces under helmets and such. The problem is exacerbated if you’re shooting at an angle where the player is backlit or even severely sidelit. For example, this might be a perfectly usable photo, but it doesn’t quite have the instant eye-catchiness of better sports photos – the entire image is really busy because the brightest-lit areas are the least detailed (field, crowd in background), and the important areas (player’s faces, bodies) are masked in shadow.
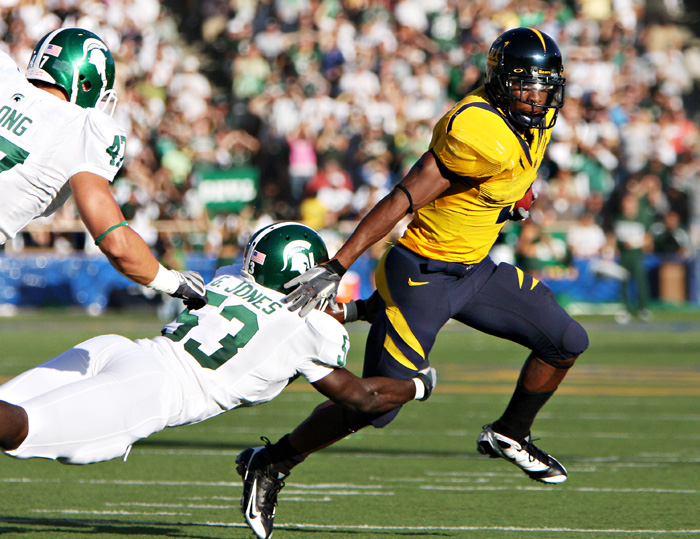
Contrast this to this fully-lit photo (actually sidelighting from the right, but the player is facing that direction anyway). Now the brightest (and instantly eye-catching) area of the image is the player’s body and face, which also happens to be the most detailed area and the focus of the image:

California running back Jahvid Best evades Michigan State tacklers
The key for daylight then (without clouds) is to get into a position where the sun is coming from behind or to the side of you (but still relatively behind, if possible). Since most games are noon or later, the sun will tend to be on the west side where it sets, so the preference would be to shoot from the west end of the stadium (of course, you may not have this luxury, as sometimes they restrict you to the visiting team’s sideline). Another strategy is to simply shoot from the endzone – most all football stadiums are oriented facing north-south to avoid playing directly into the sun during sunlight games, so at the very worst you’ll have a side-lit image, which often isn’t bad at all, as the above photo shows.
A closer look at more difficult shaded and nighttime lighting conditions after the jump.
Shade and Cloud Cover
As the sun begins to set, or if clouds start rolling in, the dynamic of the light changes completely. Rather than having harsh shadows from a single point light source (the sun), under shadow conditions the entire sky becomes your (much less intense) light source, with the atmosphere reflecting light and illuminating the field. Or with cloud cover, the entire cloud (significantly bigger than the sun in angular area terms) becomes the light source. In either case, the lighting becomes much more diffuse, which essentially eliminates shadow problems and having to take lighting direction into consideration.

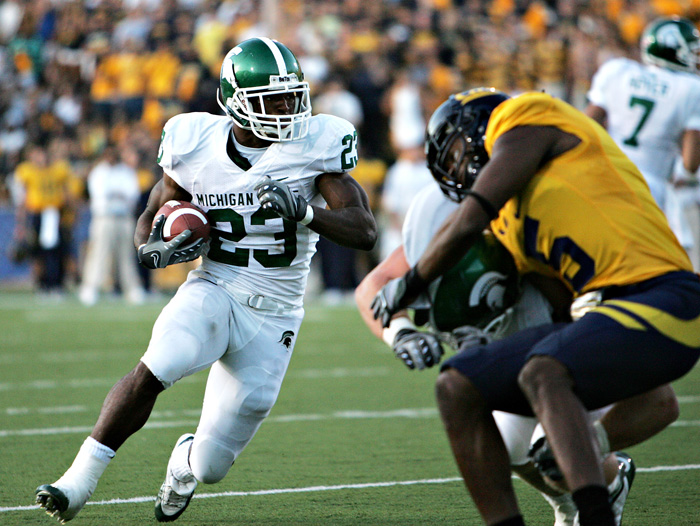
Michigan State running back Javon Ringer looks for a hole to make the quick break
I like this photo a lot, possibly moreso from a non-sports standpoint – because of the diffuse lighting you can see all the detail in the image extremely well – there’s barely anything blown out at all. It’s exactly the attributes you’d want from a sports photo if you were a landscape or interior building photographer.
One thing you’ll notice, though, is that despite the details and how easy the image is on the eyes, it definitely lacks some of the hard contrast or “bite” that one finds in bright daylight photos, like the Jahvid Best photo above. While it was definitely easy to process, once the entire stadium is shrouded in shade like it is here, it’s a bit harder to create the contrast that separates the main subject from say the background, since everything in the stadium is evenly lit.
Dealing with semi-lit half-shade
Another issue that crops up with shade as the sun sets is the in-between period when the sun has only partially set, thus leaving part of the stadium shaded and the other side still exposed. One can imagine this wreaks havoc with exposure, and lighting in general… well, it does:

Bears defensive back Michael Mohamed is backlit by the shade
Autoexposure here obviously locked onto the background and tried to bias it in favor of that. This situation is pretty bad, because the background is going to be far brighter no matter what you do, which is going to distract attention away from your primary subjects. Of course, depending on where you’re shooting this can also work in your favor, as a shaded seating area can provide a dark backdrop that focuses attention on the players:

Defensive lineman Tyson Alualu emerges from the shadows
This isn’t really a fantastic photo, but it looks a heck of a lot better than if the background was completely exposed and distracting. Other issues including subjects being half-lit:

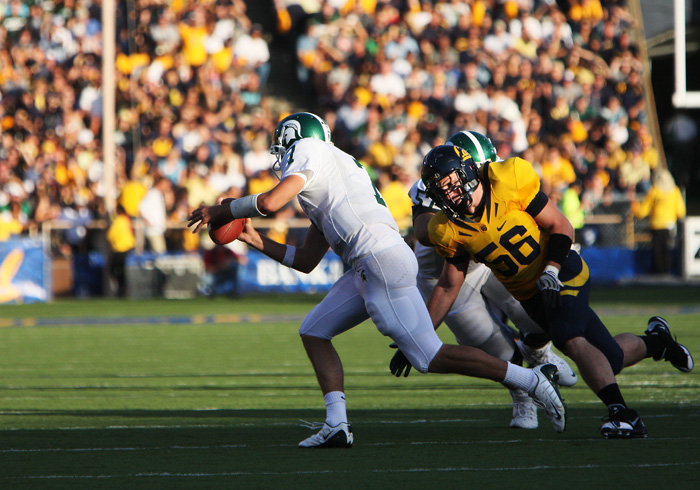
Zach Follet attempts to tackle Michigan St. quarterback Brian Hoyer through the shade
Some might say this photo looks cool or interesting, and the half-lighting effect is pretty… different. In general I’m not a huge fan because it makes the photos far less useful – you can forget about using any of these photos as a cutout because of the huge exposure difference, and it’s impossible to get the exposure just right so that you can see all of the detail – here the image is exposed for the upper bodies, and as a result you don’t see much detail or definition in their legs. Of course exposing for their lower bodies would completely blow out the top half. It’s a photo you might try publishing once purely because of the interesting lighting effect, but otherwise as a sports photo it can’t really be used for much.
For these half-shade situations, the key here, in initial or exposure or even post-processing, is to screw the background. Your focus here is on the players, so you need them to be properly exposed, clipping or blown highlights in the background be damned. Just compare these images:


Jahvid Best runs to the endzone in the shade
Yes, the background is completely blown out, and now it’s really bright and attracting even more attention before. This is true, but there are several reasons why the second image is better. Firstly, the subject now has actual, visible detail in the image, instead of being some shadowy figure that partially blended in with the ground. Secondly, those of you who know what it actually means to clip will realize that, since the second photo really has begun to clip to white, proportionally the background is now less brighter than the subject. And lastly, despite making the background brighter, blowing the highlights here serves to *decrease* detail in the background, rendering it less appealing than the well-exposed and very detailed image in the first image.
Now that we’ve ascertained that exposing for the player is of the utmost importance, how do we go about doing that on the field? The answer here is partial or spot metering. Unlike evaluative/matrix metering, partial or spot looks exclusively at the center of the image (or where ever your AF/metering point is set to) – thus it’s not affected at all by super-dark or super-bright backgrounds, and if you’re tracking the player correctly, the player will always be correctly exposed, which returns the same correct result in fully-lit situations, and the correct result you wouldn’t get otherwise in situations with a much darker or brighter background. The potential pitfall here is the possibility of the spot meter being thrown off completely by jersey brightness, since this is where you’ll most likely point at, and pretty much all the meter will see using spot. I would use something slightly larger than a spot meter – maybe the partial meter or at worst, the center-weighted average metering, which tends to be more consistent and balanced out if the players are wearing heavily contrasting jerseys (dark blue vs. white).
Nighttime and Stadium Lights
Once the sunlight levels really start to fall, stadium lights become your primary source of lighting. Depending on the stadium, this might force you to start taking drastic measures to maintain decent motion-freezing exposures – start ramping up the ISO or even shooting in RAW and underexposing if need be. Fortunately the lights at Memorial Stadium (and probably most stadiums at the college and professional level) are plenty sufficient – on a Canon 1D Mark II with 70-200 f/2.8 IS lens I was getting perfect exposures at f/2.8, 1/500s, and another Canon 40D with 70-200 f/2.8 IS + 1.4x extender setup, I simply boosted the settings to f/4.0, ISO3200 to achieve the same 1/500s shutter speeds. With less powerful lights at high school stadiums or community fields, you’ll likely need to boost up to a higher ISO (if you don’t have a higher ISO option, you can use RAW, underexpose by one stop, and boost the exposure in post-processing afterwards, which gives you nearly the same effect), or live with a little motion blur at 1/320s or 1/250s (anything below that and most of your shots will likely turn up unusable).
With most modern DSLRs, even maxed-out noise at 3200 really isn’t bad at all, especially considering that the noise will barely show up on most of the mediums for your images (web-resolution, small prints, or newspaper-quality paper). For example, here’s an ISO3200 image taken on a Canon 40D:
There’s barely any noise here – certainly nothing that makes the image unusable, and not really even enough that a non-photographer would notice. Even if you’re really a stickler for noise, you can always run your images through a noise reduction program like Neat Image to filter out what little noise there is:
Voila, an image that has about as much noise as you’d get shooting ISO400 in daylight, which is to say no noticeable noise at all. Though we’ve solved the noise problem most often associated with low-light photography, you’ll notice that the photo above still doesn’t have the same aesthetic appeal as any of the photos above taken in daylight or shaded lighting. I only have a handful of photos from a quarter of a football game to base my observations on, but the lighting quality on all of them look fairly similar to this example, which is to say the lighting is uniformly bad no matter what you do.
The first problem with stadium lighting (as with any artificial lighting) is that the color temperature of the light isn’t usually even across the visual spectrum, like daylight is (daylight will emit relatively equal amounts of red thru blue light, or an overall neutral white). Classically, tungsten lights have tended to produce more light in the red spectrum and less in the blue, while new fluorescent lights may have even weirder green-magenta shifts. Especially with some fluorescent lights that don’t even emit a continuous spectrum but simply certain specific wavelengths of light, this creates a problem where certain colored subjects aren’t as detailed or richly saturated, simply because the light source isn’t emitting the kind of wavelengths of light that they reflect.
For example, in the night photos above, notice how we have a rich and very detailed yellow, while the blue parts of the jerseys are much darker/muddier, and lack any strong blue saturation – they pretty much just look black, with a hint of blue. This is what we might expect from a light source that reflects relatively less blue wavelength light. Contrast that to the much richer blue tones we were getting in the daylight photos, where our light source had an even continuous spectrum of wavelengths:

Kevin Riley looks rich and saturated while immersed in lighting that evenly spans the visible spectrum
Unfortunately, there’s no real way to get around this problem – it’s just the nature of the lighting you have.
Another potential issue that crops up due to the uneven light spectrum problem is white balance – since the light emitted isn’t actually white, and if taken for face value (1 red photon + 1 blue photon + 1 green photon = white) would actually produce a very off-color image (usually orangish or yellowish with artificial lighting), the camera has to compensate and restore a correct “white balance” point. In my case, the opposing team wore white jerseys that provided a perfect white balance reference, so most of the images turned out fine. Even so, I’d get an off-color image every once in a while, and the problem would probably have been exacerbated if the other team was wearing a colored jersey as well:
In most cases, some color balancing in post-processing should be able to easily fix any color cast issues (the example above would take only a very small adjustment), but to fix things in camera, simply define a custom white balance in the camera. If you happen to have a grey card with you, put it under the stadium lights and you’re gold – otherwise a white jersey or pretty much anything neutral should work fine as well.
In conclusion…
Each of the three main lighting situations (four if you count the hybrid directly lit/shade situation) has its own characteristics, and accordingly advantages and disadvantages.
In terms of quality images, full daylight is probably the best to shoot in – if you can get the subject to be directly lit, you have a very well-lit images with strong, contrasty shadows on areas you don’t care about. The difficulty with daylight is that you have to keep the direction of the sun in mind – if you wind up in a situation shooting the subject while its’s sidelit or backlit, you end up with harsh shadows obscuring the detailed/important elements of the image, which can all but ruin a great picture.
On the other side, a shaded lighting situation (whether it be from a setting sun or cloud cover) constitutes probably the easiest lighting situation – with diffuse light coming in from virtually every direction, shadows are all but eliminated, allowing you to shoot from anwyhere and not worry about backlighting. While you’ll certainly get more keepers, you may never get a single shot as good as the best direct daylight shot, because the lack of shadows strips the image of the natural contrast you get from harsh shadows.
A half-lit, half-shadow situation produces interesting results – it can help the photo if you’ve got a shadow in the background, but at the same time it can also hurt the photo if you’ve got a lit area in the background. The key here is to use a center-weighted metering mode, such as center-weighted average, partial, or spot, to ensure that the main subject is always properly exposed – having the background too dark or too bright is really a secondary concern in this case.
Toughest of all is nighttime situations, simply because the quality of light is so crummy. Omni-directional lighting means filled-in shadows and less shadow contrast, while non-neutral light sources mean certain colors will simply not render as richly as they’re supposed to. The one good thing about stadium lighting, however, is that you can now switch to manual exposure, since the output of the stadium lights isn’t changing, and in a decent stadium, the entire playing area should be evenly lit (possibly not the case with lower-budget fields used for high school football or other events). Using manual exposure helps by removing autoexposure issues from the equation completely – the camera should now nail the exposure every time, without regard to jersey brightness or the illumination of the crowd in the background.
This is part 3 of 4 in Football Photography X’s and O’s, a 4-part series of insights on shooting football.
Part 1: Equipment Analysis 1 (Michigan State game)
Part 2: Aperture-priority Exposure Technique
Part 3: Lighting Situations
Part 4: Equipment Analysis 2 (Washington State game)


